
Havasupai Falls Adventure
It's that time of year again.. time for Havasupai Falls permits to go on sale! Have you ever considered going to this bucket list destination? Or maybe you've never heard of it. Or perhaps you recognize the photos, but weren't sure where this was? Havasupai Falls is a STUNNING Indian Reservation in the Grand Canyon in Arizona. It's a hefty backpacking hike into the desert and camping experience in a land of beautiful waterfalls that are a blue like none you've seen before thanks to lime. Many people expressed interest in learning more about this adventure after watching my experience on Instagram so I put this together to help answer some mysteries about the trip. You can also check out my Highlights on Instagram to see my trip first hand. Disclaimer that I am by no means an expert and am just going to share my experience. Here I'll break down the information into sections because, quite frankly, there's a lot to cover.
MY STORY:
So first I'll share how my trip to Havasupai Falls came to be. A couple of years ago I took a southwest road trip with a friend and we had planned to visit her family in Havasu Falls. Me, knowing nothing about Havasupai Falls, naively thought, "Oh, if we're in Lake Havasu we should swing by Havasupai Falls and check it out!" You know.. get that IG shot and keep on rolling. Ohhhh silly rabbit. I shared this plan to a yoga teacher coworker and she told me that, although she hated to burst my bubble, you can't just "swing through" Havasupai Falls. Not even close. Her and her boyfriend had been trying to obtain a permit there for years, in fact. Every year on February 1st, these permits go on sale. And they sell out for the entire year in one hour. ONE. HOUR. With this new discovery, I entered "Buy Havasupai Falls permit" into my calendar for Feb 1, 2020.

Overlooking Havasu Falls.

Hiking into the dessert with a pack as big as me.
Feb 1st, 2020. 9am. Time to get this permit. I login (I had set up my account in advance which you'll want to do if you intend on trying to get a permit). I login aaaand... website crashes. I keep trying. Multiple browsers. I get close... then crash. Crash. Crash. After about 30-40mins of this... I give up. I spend the next 30ish minutes on other things and then decide I'll give it ONE more attempt. I login. Get through. Only 1 set of dates left for the ENTIRE year. Without thinking, I scooped up 2 permits and thanked the universe because this was obviously meant to be.
THE PERMIT:
Some things to keep in mind about this permit.. you must camp for at least 3 nights. Day trips are no longer allowed. The reason for these permit restrictions is to help try and keep the land preserved. Because of its beauty, the land was getting heavy foot traffic and we know anytime that happens it can have negative consequences on the land. And this is a reservation where people LIVE. It's their home. Remember, permits will sell out Feb 1 so be ready. As far as I know, you cannot purchase and resell these. The person whose name is on the reso must be present.
WHAT TO PACK:
So maybe you are a big hiker/backpacker and are a pro at this, but I live in the midwest. I've hiked, but I had never backpacked to camp before. WOOF. What a learning experience. My friend who came with me had a bit more camping experience than me so she was super helpful.
Necessities:
-sleeping bag (the kind you'll need will seriously depend on what season you're camping). I had a zero degree pack because I'd been watching the nighttime temps and they dropped as low as 11 degrees the week before our trip. Better safe than sorry.
-sleeping pad
-tent, the lighter the better. And/or a hammock. Again, depending on the season you may even be able to sleep in one and not need to carry a sleeping pad.
-quality backpacking pack
-swimsuit
-hiking boots
-wool compression socks
-water/rock shoes
That Mooney Falls feeling.
-sandals
-shorts/leggings (2-3)
-tank top/tee shirt (2-3)
-water bottle or bladder
-mug for hot bev/food
-hoodie (seasonal)
-sunscreen
-toilet paper/body wipes
-hand warmers
-hat
-camp stove with small canister fuel and waterproof matches
-first aid kit
-flashlight/headlamp
-cash for the Village of Supai
-Daypack for day hikes, you don’t want to bring your huge backpacking pack
-Dry bags
-camera with extra batteries or battery pack for your cell phone
-There are 5 gallon buckets at the sites for food, but you may want to bring other food storage so critters don’t get your food/chew through your pack/tent.
GETTING THERE:

Beginning the journey.
From Chicago, I flew into Las Vegas. The second closest airport is Pheonix. It's about a 2-3 hour drive depending on which airport. I'd recommend staying somewhere nearby the night before. And I'd plan on getting to the trailhead as early as possible. You do have options of getting into Havasupai Falls: backpacking in, hiking and renting a pack mule to take your things or by helicopter.
Backpacking in: This is what we did. This is a 10 mile hike. In the desert. THE DESERT. While carrying a pack full of everything you need to live for 3-4 days. I lied to myself and told myself I would do some training hikes throughout the year to prep. I did not. LOLZ. Thankfully, my regular workouts and living on the 4th floor of my apartment helped a lot. It was not easy, though. It's a real hike. So you want that pack as light as humanly possible. You lose the most elevation in the first mile of the hike and there are a lot of switchbacks. After the first 8 miles you arrive in the town where there are little shops for supplies, WiFi and a restaurant. It's about another 2 miles to the camp grounds from there.
Hiking and renting a pack mule: Great option if you want to enjoy the hike a little more. Although, I'll be honest.. I felt bad for the mules. Also, it's not cheap. If you have a group of 4 it's most cost effective.
Helicopter: You'll make it to the town in 15 minutes. From there it's 2 miles into town. The down side is that the line gets long and you may wait around for a very long time before you get on that helicopter. Helicopters are used to take the locals in and out, as well, and they must fuel up frequently. Again... arrive as early as possible.

The view from our campsite above Mooney Falls and me below enjoying a peaceful, rare moment alone at the base.
CAMPGROUNDS:
They're lovely. It is highly stressed that you must be mindful of all of your trash and take out what you take in. You'll want to put your food items in bucks or tie them above on a rope from a tree, otherwise the critters WILL get them and you will be sad. There are composting toilets that have staff keeping up with them daily, but you may want to bring an extra toilet paper roll just in case. There are no showers or sinks. There is a natural spring for water. This is important: NO OPEN FLAMES. Meaning no fire for cooking/heat or just to enjoy a bonfire while you camp.
WEATHER:
I went in November because those were the only dates available when I got through, so that's all I can really speak to. The temps dropped to about 35 degrees at night. It was about 75 during the day, but depending where you're camping the sun sneaks in and out of the canyon pretty quickly. I imagine and I've heard, summer is quite different and it can be really toasty.
FOOD:
The base of Havasu Falls.
I had been doing Intermittent Fasting coincidentally and found that really served me for this trip because I didn't require as much food. Intermittent fasting is an entirely different blog and I'm not recommending you do this necessarily, but the lighter you can pack the better. So choose foods that are light, easy to pack and nutrient dense. You will need your energy. I packed oatmeal, bars, one jar of nut butter. And a ready to serve quinoa mix that just needed to be boiled. Also, beans. And trail mix is a good snack. Instant Coffee. Any medications/supplements you usually take are necessary, of course. I found digestive enzymes/probiotics especially helpful since I was definitely not eating as I normally do. I, of course, brought some of my essential oils and used them quite a bit. You can hike to the town for meals at the restaurant or cafe, but as mentioned it's 2 miles from the campground and kind of a waste of your precious time to enjoy the falls. Although, I did eat there twice to get my veggies... they have pretty decent salads! And a fairly extensive menu.
THE HIKES:
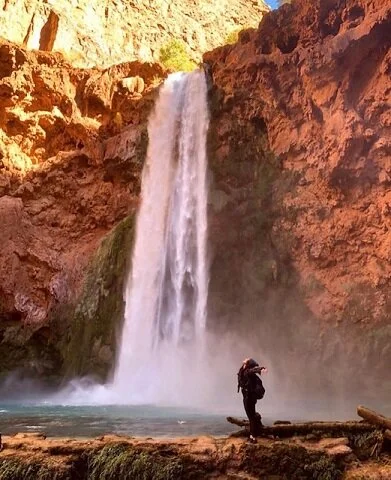
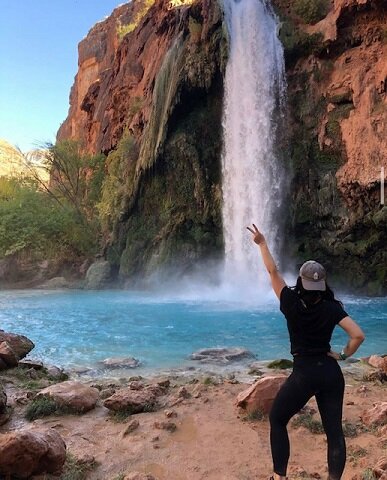
-Havasu Falls: You will see this from above on your hike into the campgrounds. If you're backpacking, it's unlikely you'll want to stop and check it out because you will be so friggin exhausted your only goal will be to get to a camp and not have a pack on your back. I would recommend going back the next day when you can go down the bottom of the falls and play a little.
Mooney Falls and Beaver Falls are the big deal hikes. Mooney Falls is at the end of the campgrounds. I was fortunate enough to score a campsite directly on top of it. It was an incredible sight to wake up to. You can also check out it's beauty without hiking down from above. To get to Beaver you must hike to the bottom of Mooney and both hikes are, well... let me explain.. :)

-Mooney Falls: You will see people hiking this before you do it and think WTF. Unless you're a regular hiker and used to climbing with chains in rock. My midwestern self was thinking... WTF. However, people of all ages, shapes and sizes were hiking it which comforted me. You take a few switchbacks down the mountain and arrive at a canyon which you must climb through. As in, inside of the mountain. Then arrive at a point where you must use metal chains built into the canyon to get the rest of the way down. Finally, a ladder takes you to the base. Keep in mind, the huge waterfall is spraying the rock and ladder so they are slippery as you do this. This is where water/rock shoes served me well. Also, gloves with grips are great for gripping the chains. Past hikers often leave extra gloves at the hike if you forget yours.

Beaver Falls.
-Beaver Falls: Once you make it to the bottom of Mooney Falls and ooh and ahh and thank whatever higher power you believe in that you didn't fall... The Beaver Falls hike begins. Some people do Mooney and skip Beaver. If you have the stamina and desire, I HIGHLY recommend you take the journey to Beaver. It's... majestic. There are dirt paths, water crossings, fields of flowers, mountain goats (if you're lucky enough to see them like I was) and so much surreal beauty. If you didn't like the ladder to Mooney you're kind of SOL. There are several more ladders to Beaver. My friend only made it with me halfway to Beaver due to some injuries/health issues so I completed most of this hike on my own. I found this to be its own adventure because I had to find my way on my own. The path is not always super clear as to whether you're going the right way, but that made it fun. Again, water/rock were shoes super helpful here. I could walk through water and climb rock/ladders and run through fields with no problems and without needing to change footwear. My biggest recommendation would be to begin this hike as early as you can to avoid crazy crowds. I managed to time this trip so that after I went to Beaver (I didn't hang out too long since I was alone) and got back to the base of Mooney I was shockingly.... completely alone. I was in between the rush of those climbing in and out and found a magical moment of peace there to myself. Very rare. Well, almost to myself. My friend who was at our campsite above Mooney actually saw me from above and was filming me and taking photos! Which was really cool. Of course, what goes up must come down and in this case, vice vera. You must climb back up the same way you climbed down to get out of Mooney. It's one trail path so if it's crowded, you will be either waiting in line for a while or trying to move around people while holding chains... not ideal. So my timing was so amazing.
There are other falls to hike to and hang out at, but these are the main ones I'd focus on. The schedule I'd recommend for this would be Havasu Falls on the day after you hike in. It's not very strenuous, but you can take in some beauty and play a little. This allows you to continue to try to recover from that 10 miler so you have more energy on Day 2 for Mooney/Beaver. Day 3 was leaving day for us, but you may be staying longer and have more time for more fun to plan differently.

LEAVING:
Same options exist for leaving as for coming in. We were planning on backpacking both ways, but after backpacking in... NOPE. We debated mule vs helicopter and decided on helicopter due to my friends injuries. As with all things about this trip, get there early for the helicopter because wait times will be looooong. And you've got that 2 mile hike with your pack to where the helicopters take off to complete first. Once you're on the chopper... you're back to the parking lot in 10-15minutes feeling very accomplished and giddy over this one of a kind experience.
IMPORTANT INFO: The website for Havasupai Falls has all the recommendations for what to pack and what you must NOT bring in. Pay close attention to that because when you're driving in, they will search your car. No alcohol/drugs/weapons are allowed.
To wrap things up, to get to Havasupai Falls and see all these gorgeous landmarks... ya gotta REALLY wanna go. That being said, it's WORTH IT. If you're planning on trying to get a permit I wish you the best of luck and an amazing trip!
Stay Wild,
Danielle
MS, RDN, LDN